Thursday, December 19, 2013

[Advanced Tutorial] BY PASS SPEED LIMIT/ OPEN ANY BLOCKED SITE/NO CERTIFICATE ERROR/NO DOWNLOAD SIZE LIMITATION?

Yes I know you are here to see if I can really open a blocked website? The computer center people/ Cyberoam blocks the websites as it is there work to do. But it is our work to open all the websites as we know we are not harming ourself by visiting the blocked websites. I really think sometime, why they really block a website? Are we kids !!!

So no more story. Here you go.

I am not responsible for any harm caused to you. 

THESE METHODS ARE NOT WORKING IN HOSTEL AREA. SORRY.
(Only for College internet.)

Plan No.1: (using Proxy)

Steps:-
1. Download this.
2. Open it.

3. You can see "Connecting Server".
4. After some time (5 sec.) "Successfully Connected to Server".


5. if in case connection will not successful then go to Option->Proxy->Choose Directly use ultrasurf.


6. minimize it and go to IE or Chrome to open all blocked websites you want.

Njoy.

Plan No.2: (using VPN)

Steps:
1. Go to this website and create an account.
2. Download this.
3. Extract the zip file in some folder.
4. Open FinchVPN.exe.


5. Go to Account tab and enter user name and password that you have given at the time of registration at finch website.


6. Then click on save/update.


7. Then come to main Menu and choose between first 3 free servers (01, 02, 05, US). 
8. Then press connect.
9. Viola!!! All the websites are unblocked :-)

Keep enjoying :)

Comparison Between the two methods:

Proxy
VPN
You have to set in the browser/download manager setting to use proxy by giving IP address and port number.
No need for any other setting.
It only opens website in a particular browser which is set to use system proxy.
It proxify the whole system.
No limitation in Download.
3GB download/browse per month. (Create Multiple account )
Download Speed is low.
Download speed. I will not tell check yourself.
How to Download any file using Proxy:

1. Open Internet Download Manager.
2. Downloads->options->Proxy/socket-> Check Use proxy and enter Ip address 127.0.0.1 and port 9666. 
3. Check http and https.
4. now download any file of any size no limitation.

How to Download torrent file using Proxy:

1. Open Utorrent.
2. Go to Options-> Preferenes-> Connection-> Under proxy Server none to http -> Give Ip address 127.0.0.1 and port 9666.
3. Check Use proxy for host name lookups and Use proxy for peer-to-peer connections.

Monday, September 30, 2013

[Advanced Tutorial] How to download Torrent using IDM?

After lot of research at last found one way to download torrent. As all of you know torrent is blocked in our institute and also many torrent to direct download websites are also blocked like our favorite www.zbigz.com is also blocked. This is so simple to download a torrent file and convert it to direct download link. Then download that direct download link using IDM.

Steps:

1. Download a torrent file from torrent website. Many torrent sites are blocked by the institute firewall still you can get many torrent sites. Google it out.

2. After you download the torrent file go to -> boxopus

Untitled

3. Create an account in the website or log in through Facebook.

4. Click on browse to add a .torrent file and click on start download. Then boxopus will start downloading your file to their server.

Untitled

5. After some time or few hours (depending on their server load) it will say status is complete.

Untitled

6. Then you can download the files using IDM.

NJOY !!!

Friday, September 6, 2013

[A NOVICE TUTORIAL] How to install and Configure DC++ ???

Shopping FREE of COST. Visit my blog.


I know all knows about this, but still some newcomers of our institute don't know, what is DC++ and how to install and configure DC++ in their PC.

Motivating all new students :
"DC++" is a file sharing software. File sharing ?? File sharing means anything that you can download from your friends computer without a pen drive but you need a LAN or WiFi connection (No Internet connection required). You can download and share files like Movies, Songs, Photos.

This is a simple tutorial. Not all the functionality of DC++ is covered. Let's start !!

So how to use this amazing service??

Steps-

1. Download a software DC++.

2. Install it on your computer. Then open it.
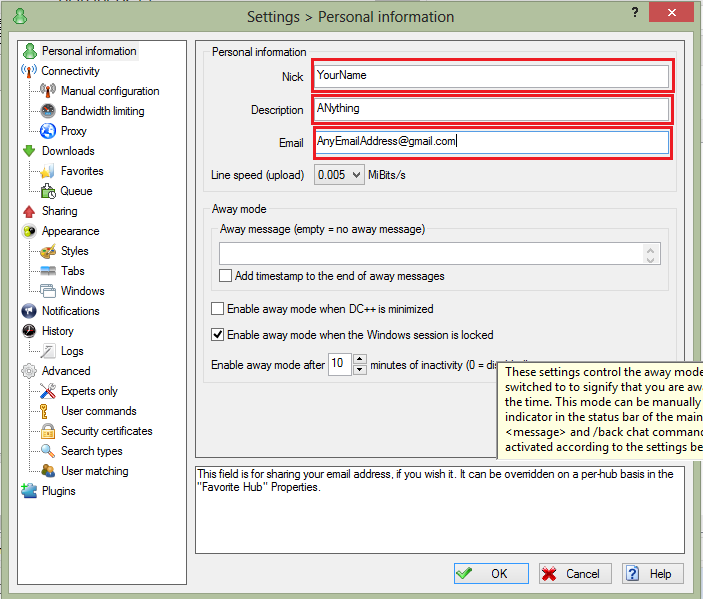
You can see a screen like this. If not go to File->Setting. Fill all your personal information. (Real/ Fake depends on you.)

 photo PersonalInfo_zps840218a4.png

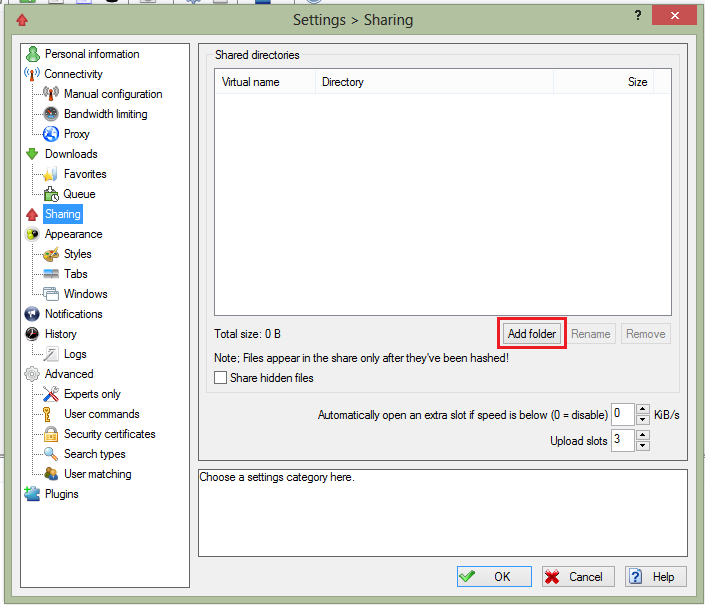
3. Then go to file -> setting. Click on Sharing. Click on Add Folder.

 photo share_zpsc5f16040.png

4. Add some folders which you want to share like Movies, Videos, Documents, Softwares, Mp3, anything that you want to share with your friend. (Warning: Don't share any personal files!!)

5. Then Click 'OK'. Then indexing will start. That means your files are going to be shared now.

6. You can view the progress of sharing your file by going to view->Indexing Progress.

6. Now Click on  File --> Quick Connect . Enter IP Address 192.168.192.168 to connect to the centralised hub.

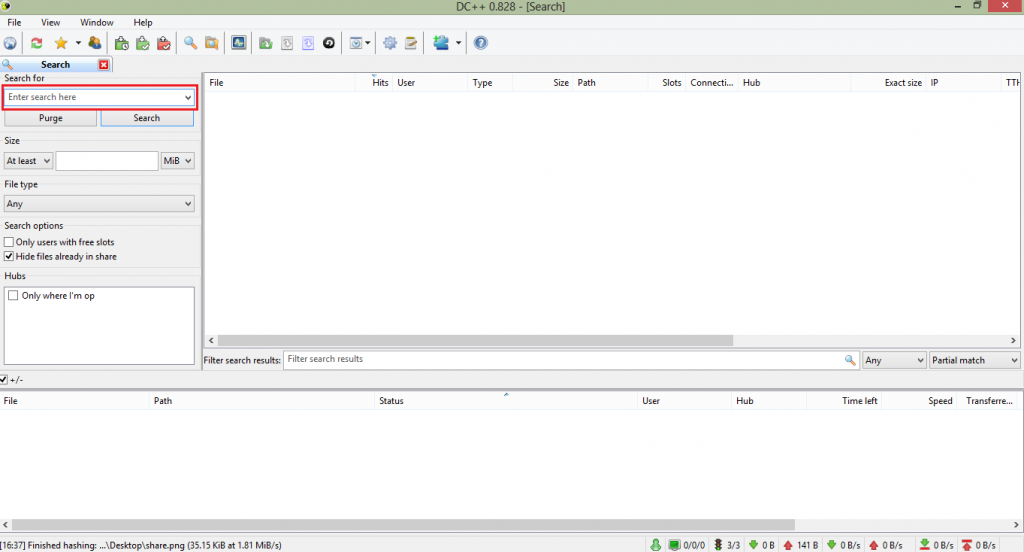
7. Now if you want to download a movie called "Satyagraha", then go to View --> Search and input your file name i.e. "Satyagraha" in the search bar. You will get some result. Right click on any one file and download.
 photo search_zps6e555a8e.png

8. There are many more functionality of DC++. You will come to know gradually.


Thursday, August 8, 2013

[ADVANCED TUTORIAL] How to Block a specific user from downloading from you in DC++ ??

Shopping FREE of COST. Visit my blog


Some time you really need this. If for any reason you don't want to upload your content to say Mr. X. Then you can block him. You can find your own reason right !! ;-)

Steps:-

1. Click on start and type "Firewall".Click on "Windows Firewall with Advanced Security"

2. Click on "Inbound Rules", then on "New Rule".

3. Click on Next.


4. Browse to "C:/Program File" then "DC++" folder and click on DC++.exe. Click NEXT.

5. Click Block the Connection Then press Next.


6. Press Next again.

7.  GIve a name like "Block DC++ User". Click Finish.

8. You can now see a new block rule "Block DC++ User". Right click on it and click on Property. Click on Scope.

9. Under Remote IP address Click on These IP addresses. Click on Add. Enter the IP address you want to block. Press OK OK.

10. Now repeat the steps from 2-9  for "Outbound Rule".

-------------------------------------------The user is now blocked.----------------------------------------------

Note:- Use this for a tutorial only. Don't do this if you really need this. Sharing is caring. Happy Sharing. 

[ADVANCED TUTORIAL] How to use Institute's HPC (High Performance Computing) @ NIT Rourkela??

Shopping FREE of COST. Visit my blog.


HPC is a very good resource of our Institute. You can use it for parallel computing using both CPU (32 cores) and GPU (2 Graphics Card Nvidea Tesla). For more detail go here. The computation time of your simulations will reduce drastically if you run your instructions parallelly. Doing multiple jobs parallelly. MATLAB is a good example of utilizing this parallel computation framework. So without wasting more time in introducing what is HPC, now we directly go about how to use this facility.

STEPS-
1. You have to go to the computer center (CC) "Server Room" and ask for the HPC application form. 
2. Fill it up and take the signature of your HOD. 
3. Apply both for CPU and GPU. The option will be there on the form.
4. Get a xerox copy of your NIT I-card.
5. Write an application to the "Head of CC" to allow your "IP Address" to use HPC facility.
6. Then submit both form and application in CC.
7. You will get the username and password to use HPC in your institute Webmail.

(THE PROCEDURE FROM 1-7 MAY CHANGE, AS IT IS OFFICIAL PROCEDURE)

8. Now you have to connect to the server starting CPU/GPU Computing. (Make sure your IP address is allowed by them, otherwise, you can't connect)
Download Putty, Xming, WinScp.
9. Install Xming and Winscp. Keep the desktop icon for both.

Configuring Putty:
10. Double click on putty (No need to install). 

11. FOR CPU COMPUTING
Enter IP: 192.168.8.100 in Putty under Host Name

12. FOR GPU COMPUTING
Enter IP: 192.168.8.142 in Putty under Host Name

13. Then click on data under Connection and Enter your username that you got from CC in mail. You don't need to enter your user id every time you login to remote HPC system.

14. Now click on SSH, and under that X11, click "Enable X11 Forwarding".

15. Now go back to Session, Enter a name like "HPC CPU" and click on save to save the profile. 

16. Repeat the same steps from 13-15 for "HPC GPU"

End Configuring Putty. 

17. Click on Xming Desktop icon and make sure it is running in-tray of your system.

18. Now if you want to use the CPU Computing, open putty and "Enable X11 Forwarding" (do it every time you want to connect) and click on "HPC CPU" and click on "open".  (Make sure Xming is running in the tray.)


19. It will only ask for a password, as we have already given our username in putty. Now Enter the password (Password is invisible). You are now connected to the server.

20. After connecting to the server First work is to change the password and give your own password.
Enter the command "passwd". Enter the Current password, then the new password two times.

21. To run MATLAB, type "matlab". Matlab will open. 

Using WinScp:

1. WinScp is used for transferring files from your local computer to HPC server. You have to use this software as you may need to transfer your matlab programs,  datasets to the HPC server for execution of the program.

2. Open WinScp. Click on NEW.

3. Enter the HPC server IP Address (CPU / GPU), Enter your user name and password. Click on Save.

4. After than click on Login to File Transfer Mode.

5. Now you can transfer your file from Local Computer (Left Side) to Server (Right). Just drag and drop.


Enjoy Your Parallel Programming Using HPC !!

[A NOVICE TUTORIAL] Forwarding mails from NITR Webmail to Primary Mail Account (Gmail/Yahoo/Rediff)

Shopping FREE of COST. Visit my blog.


It is very tedious job to check all your mail ids gmail, yahoo mail, rediff mail, etc. and also NIT Webmail etc. Here is a simple tutorial how to forward all your mails in NIT Webmail to your gmail account, so that you don't need to check every time your NIT mails and you don't miss any important updates from institute.

Steps:
1. Login to your NIT Webmail.

2. After login Click on Preferences.


3. Then click on Mail.


4. Enter your Primary mail id (Gmail/Yahoo/rediff) under "Forward a copy to". (Where u want to receive your NIT mails)


5. Then click on save. (Top left)

--------------------------------------------------------THE END-------------------------------------------------------